


Introduction
React Router is a routing library that manages navigation within a React application and lets users navigate between different pages without reloading the entire page.
In this article, we will learn the basic features of React Routing v6 and how to use it, with some examples including how to create public routing, private routing and dynamic routing as well as some hooks and how to set not found page. This guide will help you get familiar with the React Router v6 and start building more dynamic React applications.
Why use React Router?
Before diving into examples, I first want to talk about why we need React Router in the first place.
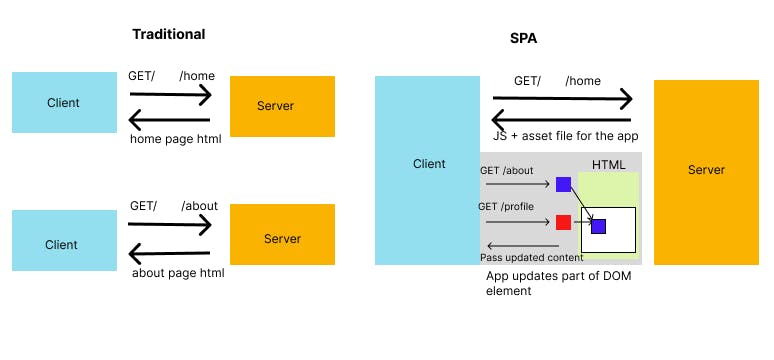
The keyword is client-side routing, and Single Page Applications(SPAs).
A Single Page Application is a type of web application that interacts with users, and dynamically updates the content of the current web page with new data fetched from the server. (like Gmail, Facebook and Netflix…) instead of the web browser loading the entire new page every time there is a request, which is the browser default.
By using React Router with React application, it allows the web application to be created as Single Page Application. React Router enables client-side routing, which allows the React app to update the URL from a link click without making another request for another document from the server. The browser doesn’t need to request an entirely new document for the next page, therefore it enables a faster user experience.
How does React Router work?
React router uses the browser’s history API to change the URL of the current page without reloading the page. This results in faster navigation and a smoother user experience.
You will need to define routes within your React application. A route is mapped between a URL and a component that should be rendered when the URL is visited. Several components are provided to define routes, including:
BrowserRouter: Root-level component to wrap the entire app, stores current location in the browser's address barRoute: Component to connect URL to components to be rendered when the URL is visitedLink: Component to link different pages within the appNavigate: Component to change the current location when it is rendered
When a user navigates to a URL that matches a route, React router renders the component associated with that route. If the URL does not match any route, React route can be configured to render the default component or to redirect to a specific URL. The route can be set as dynamic paths as well as nested.
Install and set up
To use React router, we will first need to install it in your project directory.
npm install react-router-dom
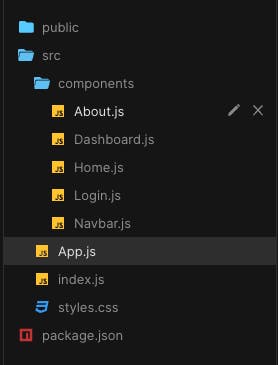
For demonstration purposes, I will create some components under the folder components right under src folder. Then let's import BrowserRouter and apply it in the App.js file to wrap the entire app.
import { BrowserRouter } from "react-router-dom";

export default function App() {
  return (
    <BrowserRouter>
      <div>App</div>
    </BrowserRouter>
  );
}
Public Route
Public route here means the routers that can be accessed by anyone, whether a user is logged in or not. They are typically for pages that do not require authentication, such as the home page and about page.
To create public routing in React using React router, you can use the Route component. Also by wrapping Route component with Routes component will match a set of child routes from the current location. Here is an example.
import Navbar from "./components/Navbar";
import Home from "./components/Home";
import About from "./components/About";
import { Routes, Route } from 'react-router-dom';


function App() {
  return (
    <BrowserRouter>
      <Navbar />
      <Routes>
        <Route exact path="/" element={<Home />}>
        <Route path="/about" element={<About />}>
        <Route path="/login" element={<Login />}>
      </Routes>
    </BrowserRouter>
  );
}
In this example, we are using Route component to define three public routes: the home page, the about page and the login page. For a user to navigate each page, let's add Link component to Navbar component.
import { Link } from "react-router-dom";

const Navbar = () => (
  <div className="navbar">
    <Link to="/">
      <button className="btn">Home</button>
    </Link>
    <Link to="/about">
      <button className="btn">About</button>
    </Link>
    <Link to="/login">
      <button className="btn btn-prime">Login</button>
    </Link>
  </div>
);

export default Navbar;
Now when you click each button on the Navigation bar, it will navigate to each page.

Private Route
Now let's create the private route. Private routes here refer to the routes that require authentication. They are typically for pages that are displayed after the user logs in such as the user profile page and dashboard.
In this chapter, I will demonstrate two ways to define the private route. One is to create a custom component for a private route to wrap the component you want to render in the page, and the other is similar, but to create a custom component for a private route and using Outlet component utilizing nested route in app.js.
Firstly, to create a private route, let's start with creating a private route component, and wrap Dashboard component where a user needs to be logged in.
For demonstration purposes, I created a state called isLoggedIn to track the user's login status.
import { Navigate } from "react-router-dom";

const PrivateRoute = ({ children, isLoggedIn }) => {
  return !isLoggedIn ? <Navigate to="/login" /> : children;
};

export default PrivateRoute;
import { useState } from "react";
import Navbar from "./components/Navbar";
import Home from "./components/Home";
import About from "./components/About";
import Login from "./components/Login";
import Dashboard from "./components/Dashboard";
import PrivateRoute from "./routing/PrivateRoute";

import { BrowserRouter, Routes, Route } from "react-router-dom";

import "./styles.css";

export default function App() {
  const [isLoggedIn, setIsLoggedIn] = useState(false);

  return (
    <BrowserRouter>
      <Navbar isLoggedIn={isLoggedIn} />
      {isLoggedIn ?
        <h3>User logged in!</h3>
        :
        <h3>User not logged in</h3>}
      <Routes>
        <Route
          path="/"
          element={
            <Home
                isLoggedIn={isLoggedIn}
                setIsLoggedIn={setIsLoggedIn}
            />
          }
        />
        <Route
            path="/about"
            element={
                <About isLoggedIn={isLoggedIn} />
            } />
        <Route
          path="/login"
          element={
            <Login
                isLoggedIn={isLoggedIn}
                setIsLoggedIn={setIsLoggedIn}
            />
          }
        />
        <Route
          path="/dashboard"
          element={
            <PrivateRoute
                isLoggedIn={isLoggedIn}
                setIsLoggedIn={setIsLoggedIn}
             >
              <Dashboard />
            </PrivateRoute>
          }
        />
      </Routes>
    </BrowserRouter>
  );
}
Now when a user types '/dashboard' manually on the address bar to see the dashboard page, they will be redirected to the login page unless they log in, and won't be able to have access to the dashboard page.
We can also utilize hooks that are provided by React router, I will use useNavigate hook to navigate the user after login in Home component. After the user clicks the login button, it will trigger the state change, and if isLoggedin is true, the app will navigate the user to "/dashboard".
import { useNavigate } from "react-router-dom";

const Home = ({ isLoggedIn, setIsLoggedIn }) => {
  const navigate = useNavigate();

  if (isLoggedIn) {
    return navigate("/dashboard");
  }

  return (
    <section className="section vertical">
      <h1>Home Page</h1>
      <button
          onClick={e => setIsLoggedIn(!isLoggedIn)}
          className="btn btn-prime">
        {!isLoggedIn ? "Login" : "Logout"}
      </button>
    </section>
  );
};

export default Home;
Another way to set protected routes is to use Outlet component. An Outlet should be used in parent route elements to render their child route elements. (Route component can be nested). This allows nested UI to show up when child routes are rendered. If the parent route matches exactly, it will render a child index route or nothing if there is not index route.
So it would look like this:
I will create another custom component for private routes just for demonstration purposes.
import { Navigate, Outlet } from "react-router-dom";

const PrivateRouteWithOutlet = ({ isLoggedIn }) => {
  return !isLoggedIn ? <Navigate to="/login" /> : <Outlet />;
};

export default PrivateRouteWithOutlet;
export default function App() {
  const [isLoggedIn, setIsLoggedIn] = useState(false);

  return (
    <BrowserRouter>
      <!--- -->
      <Routes>
        <Route element={<PrivateRouteWithOutlet />}>
          <Route path="/profile" element={<Profile />} />
        </Route>
      </Routes>
    </BrowserRouter>
  );
}
It does the same thing: protect routes when the user is not authenticated. If there are multiple protected routes, the second way would look neater... I guess.
Dynamic Route
So we have learned how to define public routes, private routes and nested routes. Next, we will learn how to define dynamic routes. Dynamic route here refers to routes that are created dynamically based on data from external sources, such as a database or API. They are typically used for pages that display dynamic content like blog posts.
I will define the route under the protected route.
export default function App() {
  const [isLoggedIn, setIsLoggedIn] = useState(false);

  return (
    <BrowserRouter>
    <!--- -->
       <Routes>
        <Route element={<PrivateRouteWithOutlet />}>
          <Route path="/profile" element={<Profile />} />
          <Route path="/post/:id" element={<Post />} />
        </Route>
      </Routes>
    </BrowserRouter>
  );
}
In the Profile component, I will create a table that has Link to each blog post. So when the button is clicked, it will navigate the user to each blog post page.
import { Link } from "react-router-dom";

const Profile = () => (
  <section className="section vertical">
    <h1>Profile Page</h1>
    <table>
      <tr>
        <th>Post title</th>
        <th>Post Id</th>
        <th />
      </tr>
      <tr>
        <td>Post 1</td>
        <td>1</td>
        <td>
          <Link to="/post/1">
            <button className="btn btn-secondary">View</button>
          </Link>
        </td>
      </tr>
      <tr>
        <td>Post 2</td>
        <td>2</td>
        <Link to="/post/2">
          <button className="btn btn-secondary">View</button>
        </Link>
      </tr>
      <tr>
        <td>Post 3</td>
        <td>3</td>
        <Link to="/post/3">
          <button className="btn btn-secondary">View</button>
        </Link>
      </tr>
    </table>
  </section>
);

export default Profile;
It would look like this.

User clicking the View button should navigate to the post page each displaying different content.
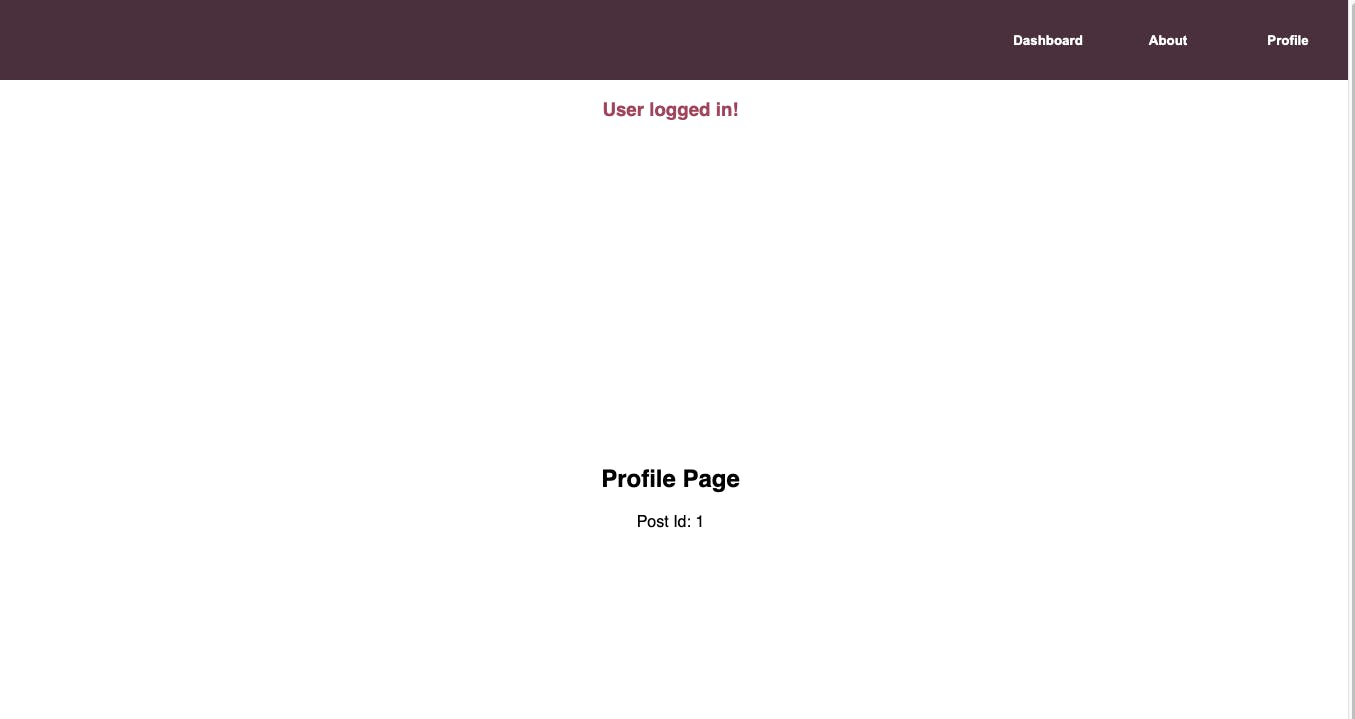
The parameter on the URL can be accessed using useParams hook like this.
import { useParams } from "react-router-dom";

const Post = () => {
  const { id } = useParams();

  return (
    <section className="section vertical">
      <h1>Profile Page</h1>
      <div>
        Post Id: <span>{id}</span>
      </div>
    </section>
  );
};

export default Post;
Not Found Page
Finally, I want to create a page to display when the user types a URL that does not exist. Let's create a component called NotFound, and add another route with a path equal to an asterisk. If the user manually types something that is not defined in the app, it will display the NotFound component.
const NotFound = () => (
  <section className="section">
    <h1>Page Not Found</h1>
  </section>
);

export default NotFound;
import NotFound from "./components/NotFound";

export default function App() {
  const [isLoggedIn, setIsLoggedIn] = useState(false);

  return (
    <BrowserRouter>
      <!--- -->
      <Routes>
        <Route path="*" element={<NotFound />}/>
      </Routes>
    </BrowserRouter>
  );
}
Conclusion
At last, we have covered why we use React Router and how to define public routes, private routes and dynamic routes as well as some hooks and how to set the not found page. I hope this article helped you get familiar with React Router and start building your own React application with React Router.
I will link the code sandbox for the demo project I created for this article. Feel free to check it out!